Image Classification Inference with FastAPI

Table of Contents
Have you ever wondered how companies train image recognition models and then deploy them to the cloud to integrate with mobile apps or other edge devices?
In this tutorial, we will explore the process of training an image classification model (fine-tuning) and creating an endpoint API using FastAPI. We will fine-tune a ResNet18 model on the CIFAR10 dataset and create a production-ready API for real-time inference.
Why Use FastAPI for Machine Learning Projects?
FastAPI is a new standard for creating endpoint inference for all kinds of machine learning applications. All you need is a basic understanding of Python to build your own AI service in minutes. Additionally, it provides the following features:
- Performance: It leverages asynchronous programming and Uvicorn to handle many concurrent requests.
- Ease of Use: Clear, concise code that is easy to develop and maintain.
- Auto-generated Documentation: Provides interactive API documentation via Swagger UI out-of-the-box.
- Production Readiness: Can be scaled using multiple workers and deployed using Docker or other containerization solutions.
Building and Training the Image Classification Model
We will now use the CIFAR10 dataset to fine-tune a ResNet18 model. The CIFAR10 dataset consists of 60,000 32x32 color images in 10 classes, with 6,000 images per class. It is a widely used benchmark dataset for image classification tasks.
Below is the Python script (model.py) that fine-tunes a ResNet18 model on the CIFAR10 dataset. It generates the model evaluation metrics and saves the fine-tuned model in the root directory.
Note: We won’t be discussing the details of the model training process here, as our main focus is on building an image classification inference using the FastAPI framework.
import time
import torch
import torch.nn as nn
import torch.optim as optim
from torch.optim import lr_scheduler
from torchvision import datasets, models, transforms

# Define data transforms for training and validation.
data_transforms = {
    "train": transforms.Compose(
 [
 transforms.Resize((224, 224)),
 transforms.RandomHorizontalFlip(),
 transforms.ToTensor(),
 transforms.Normalize([0.485, 0.456, 0.406], [0.229, 0.224, 0.225]),
 ]
 ),
    "val": transforms.Compose(
 [
 transforms.Resize((224, 224)),
 transforms.ToTensor(),
 transforms.Normalize([0.485, 0.456, 0.406], [0.229, 0.224, 0.225]),
 ]
 ),
}

# Load the CIFAR10 dataset for training and validation.
train_dataset = datasets.CIFAR10(
    root="./data", train=True, download=True, transform=data_transforms["train"]
)
val_dataset = datasets.CIFAR10(
    root="./data", train=False, download=True, transform=data_transforms["val"]
)

dataloaders = {
    "train": torch.utils.data.DataLoader(
 train_dataset, batch_size=32, shuffle=True, num_workers=4
 ),
    "val": torch.utils.data.DataLoader(
 val_dataset, batch_size=32, shuffle=False, num_workers=4
 ),
}

dataset_sizes = {"train": len(train_dataset), "val": len(val_dataset)}
class_names = train_dataset.classes  # CIFAR10 classes

# Device configuration
device = torch.device("cuda:0" if torch.cuda.is_available() else "cpu")

# Load a pre-trained ResNet18 model and modify the last fully connected layer.
model_ft = models.resnet18(weights=models.ResNet18_Weights.IMAGENET1K_V1)
num_ftrs = model_ft.fc.in_features
model_ft.fc = nn.Linear(num_ftrs, len(class_names))
model_ft = model_ft.to(device)

criterion = nn.CrossEntropyLoss()
optimizer_ft = optim.SGD(model_ft.parameters(), lr=0.001, momentum=0.9)
exp_lr_scheduler = lr_scheduler.StepLR(optimizer_ft, step_size=7, gamma=0.1)

def train_model(model, criterion, optimizer, scheduler, num_epochs=25):
 since = time.time()
 best_model_wts = model.state_dict()
 best_acc = 0.0

    for epoch in range(num_epochs):
        print(f"Epoch {epoch}/{num_epochs - 1}")
        print("-" * 10)

        # Each epoch has a training and validation phase.
        for phase in ["train", "val"]:
 model.train() if phase == "train" else model.eval()
 running_loss = 0.0
 running_corrects = 0

            for inputs, labels in dataloaders[phase]:
 inputs, labels = inputs.to(device), labels.to(device)
 optimizer.zero_grad()

                with torch.set_grad_enabled(phase == "train"):
 outputs = model(inputs)
 _, preds = torch.max(outputs, 1)
 loss = criterion(outputs, labels)
                    if phase == "train":
 loss.backward()
 optimizer.step()

 running_loss += loss.item() * inputs.size(0)
 running_corrects += torch.sum(preds == labels.data)

            if phase == "train":
 scheduler.step()

 epoch_loss = running_loss / dataset_sizes[phase]
 epoch_acc = running_corrects.double() / dataset_sizes[phase]
            print(f"{phase} Loss: {epoch_loss:.4f} Acc: {epoch_acc:.4f}")

            # Save the best model weights on validation.
            if phase == "val" and epoch_acc > best_acc:
 best_acc = epoch_acc
 best_model_wts = model.state_dict()

        print()

 time_elapsed = time.time() - since
    print(f"Training complete in {time_elapsed // 60:.0f}m {time_elapsed % 60:.0f}s")
    print(f"Best val Acc: {best_acc:.4f}")
 model.load_state_dict(best_model_wts)
    return model

if __name__ == "__main__":
    # This guard is required for Windows to safely use multiprocessing.
 model_ft = train_model(
 model_ft, criterion, optimizer_ft, exp_lr_scheduler, num_epochs=5
 )
 torch.save(model_ft.state_dict(), "finetuned_model.pth")
The accuracy has improved with each epoch, and the loss has gradually reduced, which is great.
$ python model.py
Epoch 0/4
----------
train Loss: 0.3998 Acc: 0.8677
val Loss: 0.1911 Acc: 0.9363

Epoch 1/4
----------
train Loss: 0.1708 Acc: 0.9429
val Loss: 0.1605 Acc: 0.9450

Epoch 2/4
----------
train Loss: 0.1159 Acc: 0.9617
val Loss: 0.1423 Acc: 0.9491

Epoch 3/4
----------
train Loss: 0.0846 Acc: 0.9727
val Loss: 0.1374 Acc: 0.9535

Epoch 4/4
----------
train Loss: 0.0617 Acc: 0.9798
val Loss: 0.1375 Acc: 0.9556

Training complete in 20m 16s
Best val Acc: 0.9556
As we can see, the training process is accelerated by the GPU (CUDA). Fine-tuning the model on the new dataset took just 8 minutes.
Building and Testing the Endpoint Model Inference using FastAPI
Now, let’s create the FastAPI application that serves the model for inference.
We will create the following endpoints:
/health: Checks if the API is running and displays the device (CPU/GPU)./metadata: Provides model details like architecture, class names, and device./class_names: Returns the list of CIFAR10 class names./predict: Accepts an image file, preprocesses it, and predicts its class./predict_with_confidence: Similar to /predict but also returns confidence scores for the top 3 predictions.
We will load a fine-tuned ResNet18 model with weights from finetuned_model.pth. The final layer will be adjusted to match the 10 classes of CIFAR10, and inference will be run on the GPU.
For image processing, we will resize images to 224x224 pixels, convert them to tensors, and normalize them using the standard ResNet values.
Finally, we will run the API using uvicorn with multiple workers for production readiness.
Below is the FastAPI application (app.py) that loads the fine-tuned model and exposes multiple endpoints:
import io
import torch
import torch.nn as nn
import torchvision.transforms as transforms
import uvicorn
from fastapi import FastAPI, File, HTTPException, UploadFile
from fastapi.responses import JSONResponse
from PIL import Image
from torchvision import models

# Initialize FastAPI app
app = FastAPI(
    title="Image Classification API",
    description="A production-ready API for image classification using a fine-tuned model on CIFAR10.",
)

# Define CIFAR10 class names
class_names = [
    "airplane",
    "automobile",
    "bird",
    "cat",
    "deer",
    "dog",
    "frog",
    "horse",
    "ship",
    "truck",
]
num_classes = len(class_names)

device = torch.device("cuda:0" if torch.cuda.is_available() else "cpu")

# Load the fine-tuned ResNet18 model.
# Replace the deprecated 'pretrained=False' with 'weights=None'
model = models.resnet18(weights=None)
num_ftrs = model.fc.in_features
model.fc = nn.Linear(num_ftrs, num_classes)
model.load_state_dict(torch.load("finetuned_model.pth", map_location=device))
model.to(device)
model.eval()

# Preprocessing transforms (should match the validation transforms used during training)
preprocess = transforms.Compose(
 [
 transforms.Resize((224, 224)),
 transforms.ToTensor(),
 transforms.Normalize([0.485, 0.456, 0.406], [0.229, 0.224, 0.225]),
 ]
)

@app.get("/health", summary="Health Check", tags=["Status"])
async def health_check():
    return {"status": "ok", "message": "API is running", "device": str(device)}

@app.get("/metadata", summary="Get Model Metadata", tags=["Metadata"])
async def get_metadata():
 metadata = {
        "model_architecture": "ResNet18",
        "num_classes": num_classes,
        "class_names": class_names,
        "device": str(device),
        "model_weights_file": "finetuned_model.pth",
        "description": "Model fine-tuned on CIFAR10 dataset",
 }
    return JSONResponse(metadata)

@app.get("/class_names", summary="Get Class Names", tags=["Metadata"])
async def get_class_names():
    return JSONResponse({"class_names": class_names})

@app.post("/predict", summary="Predict Image Class", tags=["Inference"])
async def predict(file: UploadFile = File(...)):
    # Validate file type.
    if not file.filename.lower().endswith((".png", ".jpg", ".jpeg")):
        raise HTTPException(
            status_code=400,
            detail="Invalid image format. Only PNG and JPEG are supported.",
 )
    try:
 contents = await file.read()
 image = Image.open(io.BytesIO(contents)).convert("RGB")
    except Exception:
        raise HTTPException(status_code=400, detail="Error processing image.")

    # Preprocess the image.
 input_tensor = preprocess(image).unsqueeze(0).to(device)
    with torch.no_grad():
 outputs = model(input_tensor)
 _, preds = torch.max(outputs, 1)

 predicted_class = class_names[preds[0]]
    return JSONResponse({"predicted_class": predicted_class})

@app.post(
    "/predict_with_confidence",
    summary="Predict Image Class with Confidence",
    tags=["Inference"],
)
async def predict_with_confidence(file: UploadFile = File(...)):
    # Validate file type.
    if not file.filename.lower().endswith((".png", ".jpg", ".jpeg")):
        raise HTTPException(
            status_code=400,
            detail="Invalid image format. Only PNG and JPEG are supported.",
 )
    try:
 contents = await file.read()
 image = Image.open(io.BytesIO(contents)).convert("RGB")
    except Exception:
        raise HTTPException(status_code=400, detail="Error processing image.")

    # Preprocess the image.
 input_tensor = preprocess(image).unsqueeze(0).to(device)
    with torch.no_grad():
 outputs = model(input_tensor)
 probabilities = torch.nn.functional.softmax(outputs, dim=1)
 top_probs, top_idxs = torch.topk(probabilities, k=3)  # get top 3 predictions
 top_probs = top_probs.cpu().numpy().tolist()[0]
 top_idxs = top_idxs.cpu().numpy().tolist()[0]
 predictions = [
 {"class": class_names[idx], "confidence": prob}
            for idx, prob in zip(top_idxs, top_probs)
 ]

    return JSONResponse({"predictions": predictions})

if __name__ == "__main__":
    # Run the API with multiple workers for production readiness.
 uvicorn.run("app:app", host="0.0.0.0", port=8000, workers=4)
Run the API with:
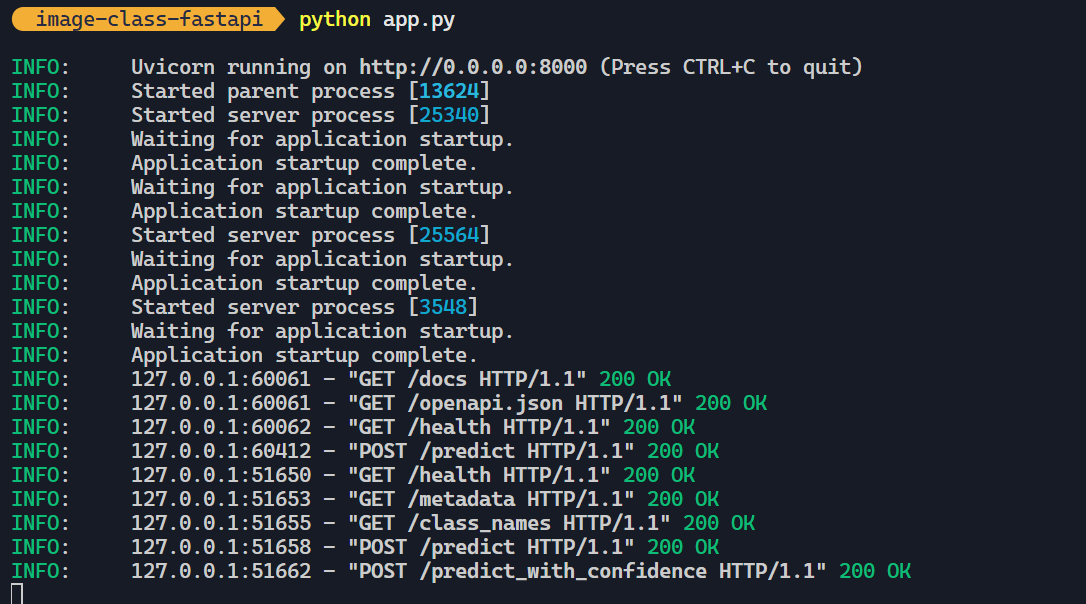
$ python app.py
As we can see, the API is running on the local machine.
Accessing the API
There are two ways to interact with the API:
- Using the built-in user interface (SwaggerUI).
- Using Python
requestslibrary.
Using SwaggerUI
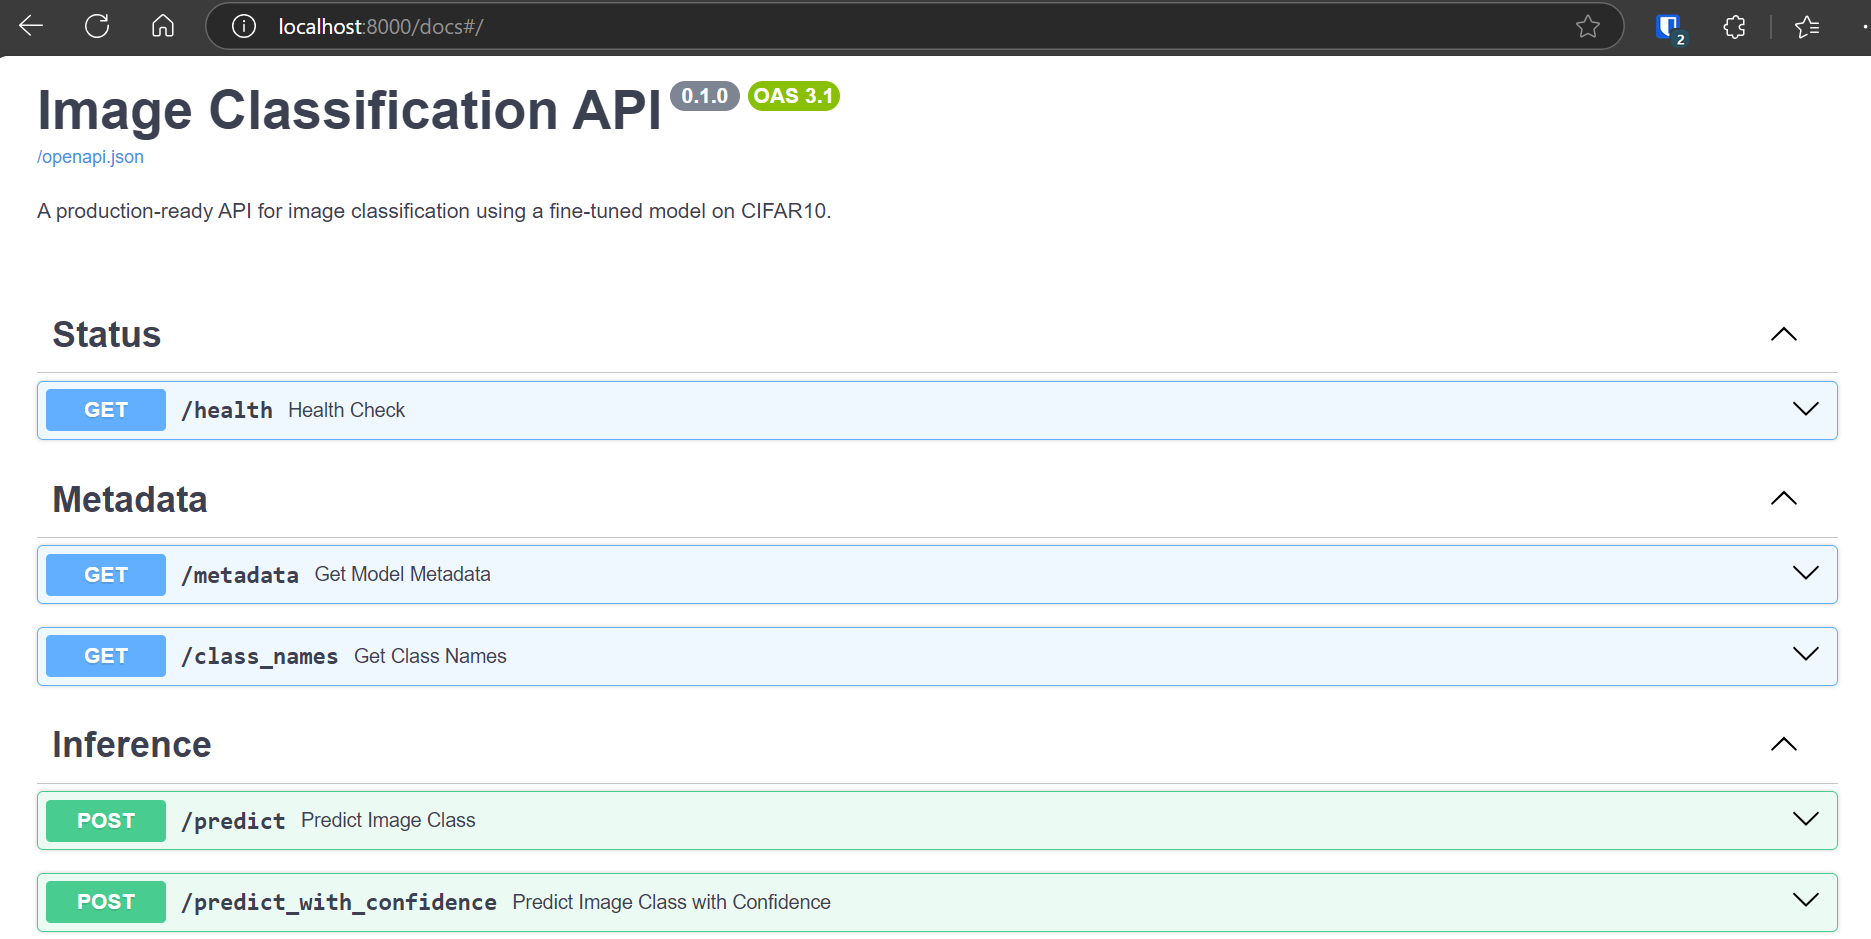
Once the API is running, navigate to http://localhost:8000/docs to access the interactive SwaggerUI dashboard. Here, you can test all endpoints directly in your browser.
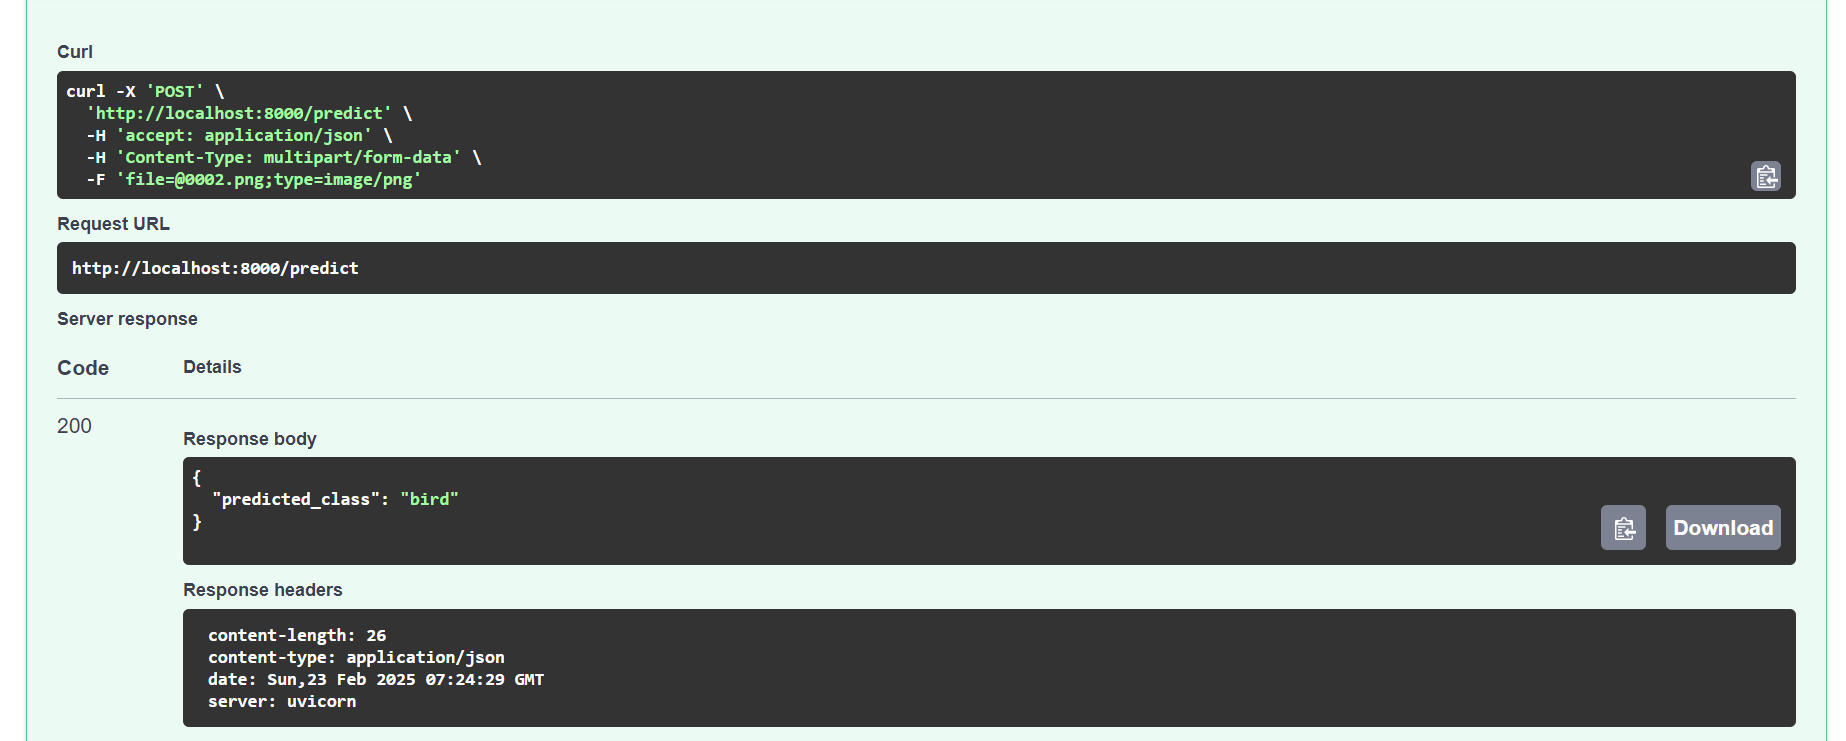
We will load the image to the /predict endpoint and then send the request.
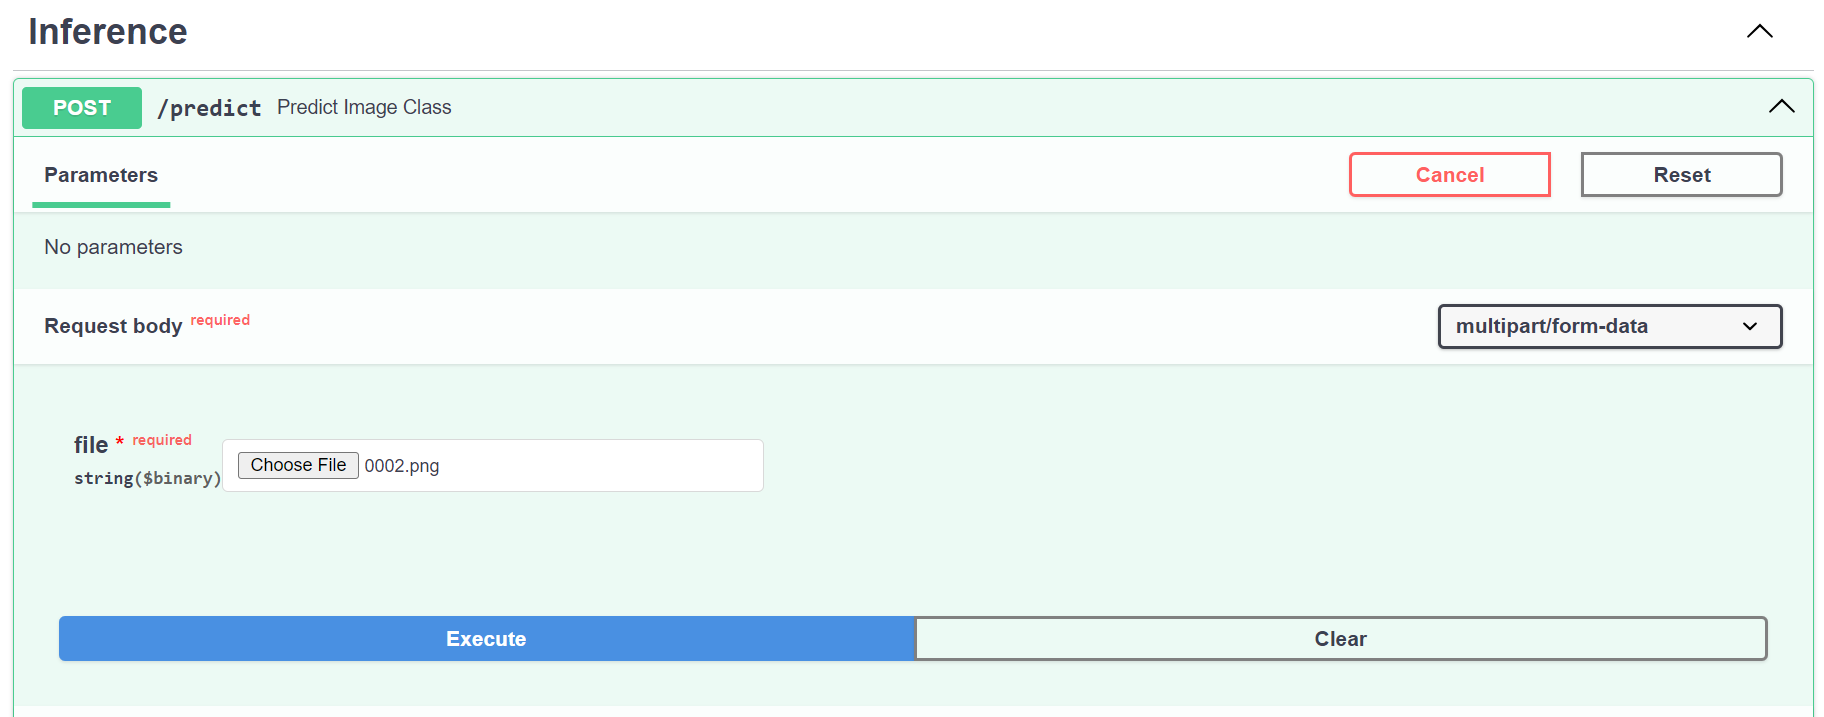 As we can see, the model predicted the image as a
 bird, which is accurate.
Using Python
Below is a code for the Python client (client.py) that shows how to interact with the API using Python’s requests library.
import requests

# Base URL for the API
BASE_URL = "http://localhost:8000"

def health_check():
 url = f"{BASE_URL}/health"
 response = requests.get(url)
    print("Health Check Response:")
    print(response.json())

def get_metadata():
 url = f"{BASE_URL}/metadata"
 response = requests.get(url)
    print("Metadata Response:")
    print(response.json())

def get_class_names():
 url = f"{BASE_URL}/class_names"
 response = requests.get(url)
    print("Class Names Response:")
    print(response.json())

def predict_image(file_path):
 url = f"{BASE_URL}/predict"
    with open(file_path, "rb") as f:
 files = {"file": f}
 response = requests.post(url, files=files)
    print("Predict Response:")
    print(response.json())

def predict_with_confidence(file_path):
 url = f"{BASE_URL}/predict_with_confidence"
    with open(file_path, "rb") as f:
 files = {"file": f}
 response = requests.post(url, files=files)
    print("Predict with Confidence Response:")
    print(response.json())

if __name__ == "__main__":
    # Perform a health check
 health_check()

    # Get model metadata
 get_metadata()

    # Get class names
 get_class_names()

    # Provide the path to a sample image to test prediction endpoints
 sample_image_path = "data/sample/cat.png"  # Change this to your local image path

    # Predict the image class (single prediction)
 predict_image(sample_image_path)

    # Predict the image class with top-3 confidence scores
 predict_with_confidence(sample_image_path)
Run the client with:
$ python client.py
We have tested all the endpoints and printed out the results.
Health Check Response:
{
  "status": "ok",
  "message": "API is running",
  "device": "cuda:0"
}
Metadata Response:
{
  "model_architecture": "ResNet18",
  "num_classes": 10,
  "class_names": [
    "airplane",
    "automobile",
    "bird",
    "cat",
    "deer",
    "dog",
    "frog",
    "horse",
    "ship",
    "truck"
 ],
  "device": "cuda:0",
  "model_weights_file": "finetuned_model.pth",
  "description": "Model fine-tuned on CIFAR10 dataset"
}
Class Names Response:
{
  "class_names": [
    "airplane",
    "automobile",
    "bird",
    "cat",
    "deer",
    "dog",
    "frog",
    "horse",
    "ship",
    "truck"
 ]
}
Predict Response:
{
  "predicted_class": "cat"
}
Predict with Confidence Response:
{
  "predictions": [
 {
      "class": "cat",
      "confidence": 0.9045
 },
 {
      "class": "bird",
      "confidence": 0.0549
 },
 {
      "class": "dog",
      "confidence": 0.0399
 }
 ]
}
Now we have information about system health, metadata, class names, predictions, and predictions with confidence levels.
Conclusion
In this tutorial, we explored how to fine-tune an image classification model using PyTorch and serve it as a production-ready API with FastAPI. We also provided practical examples of accessing the API using Swagger UI and Python.
If you are interested in learning more about machine learning or MLOps in general, please subscribe. If you are looking for consultancy in implementing these solutions in your project, please contact us. We are here to help.
The code for this tutorial is available on GitHub: kingabzpro/image-classification-fastapi.